Calculated simple question type

An example of Calculate simple question type
Overview:
This guide will show you how to create a Calculated simple question type.
What to know:
The features of Calculated simple question type is listed below.
- It supports random variables into the questions. As can be seen from the example above, one student see the question as the first picture, while another student see the question as the second picture. It is this question uses random variables.
- It supports answer tolerance and the use of units.
Table of Contents
- Step 1: Access the Quiz activity where you want to create the question
- Step 2: Click the 'Questions' tab.
- Step 3: Add a new question
- Step 4: Choose a question type
- Step 5: Give a question name
- Step 6: Give the question text
- Step 7: Set up the full mark and general feedback (optional)
- Step 8: Give the correct answer
- Step 9: Give partially correct answers (optional)
- Step 10: Enable the use of units (optional)
- Step 11: Define units (optional)
- Step 12: Add random variables
- Step 13: Define random variables
- Step 14: Create random variables
- Step 15: Display random variables
- Step 16: View random variables
- Step 17: View random variables
- Step 18: Edit random variables (2)
- Step 19: View the random variables
- Step 20: Define units (optional)
- Step 21: Save the question
Step 1: Access the Quiz activity where you want to create the question
In your module area/course, click the link of the Quiz activity where you want to create a question.

Note: If an appropriate Quiz activity doesn’t exist in your module area/course, please see Add a quiz for details of how to create one.
Step 2: Click the 'Questions' tab.
- Click the 'Questions' tab.
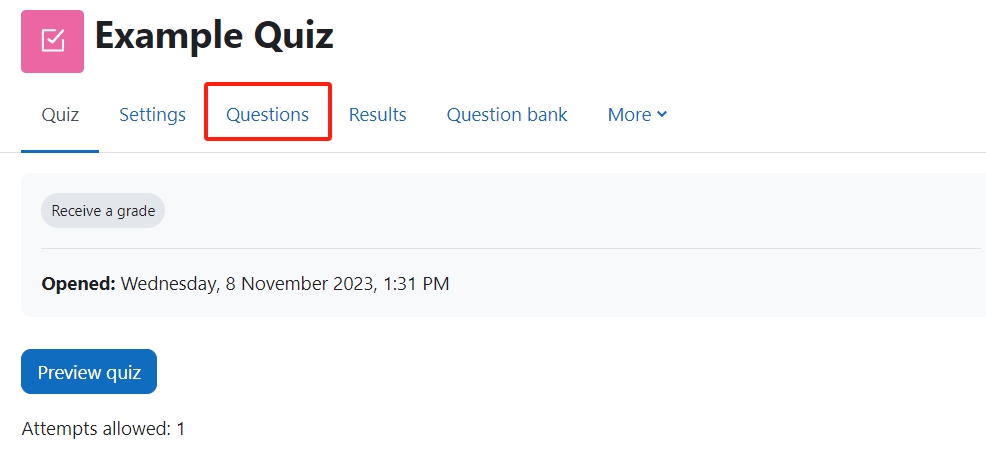
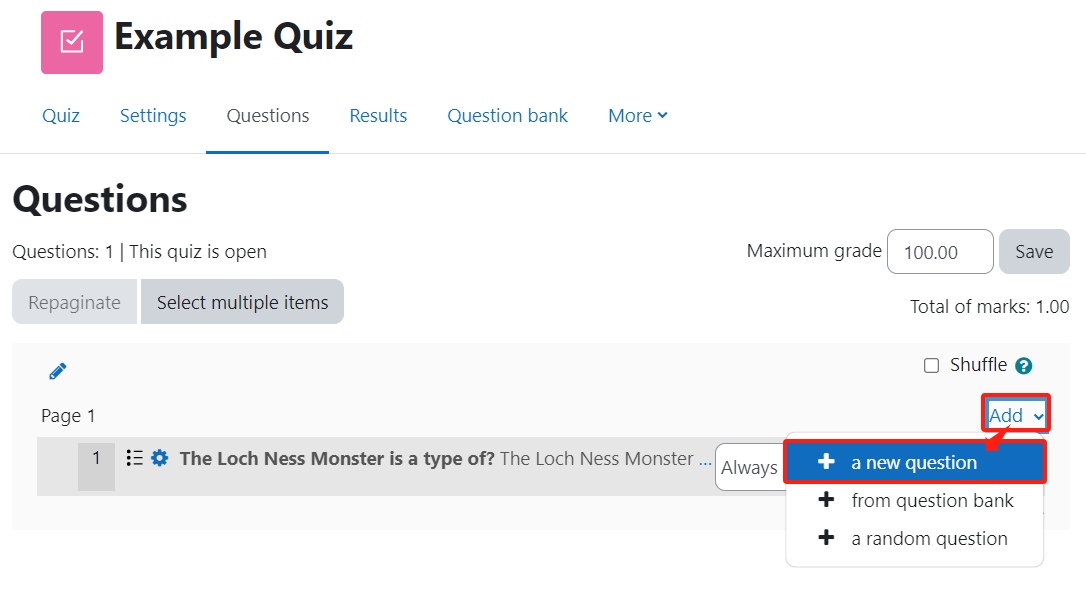
Step 3: Add a new question
- On the following page, click the ’Add’ link.
- Click the ’a new question’ link in the dropdown menu.
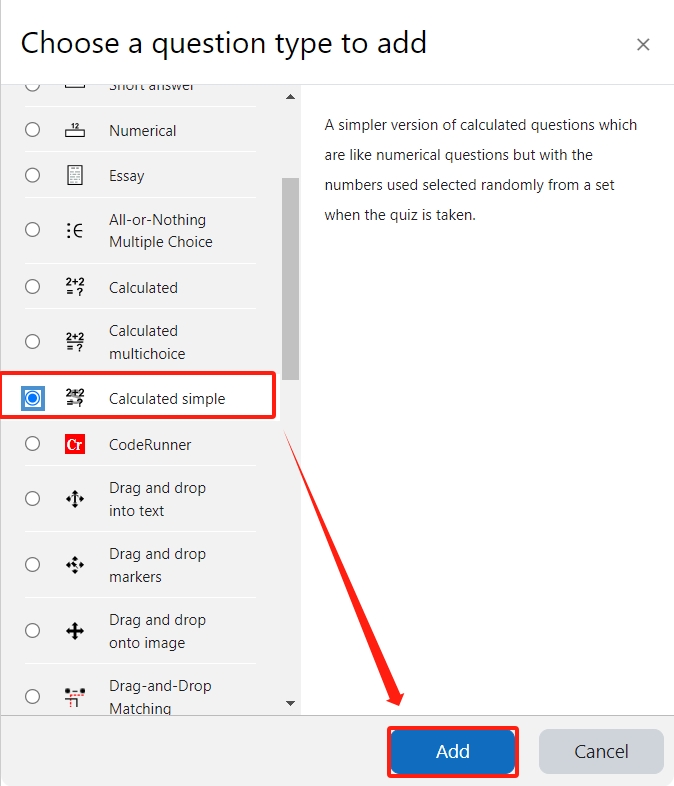
Step 4: Choose a question type
- Locate and select the Calculated simple question type from the pop-up window.
- Click the ’Add’ button.
Step 5: Give a question name
Give a question name in the 'Question name' setting.

Step 6: Give the question text
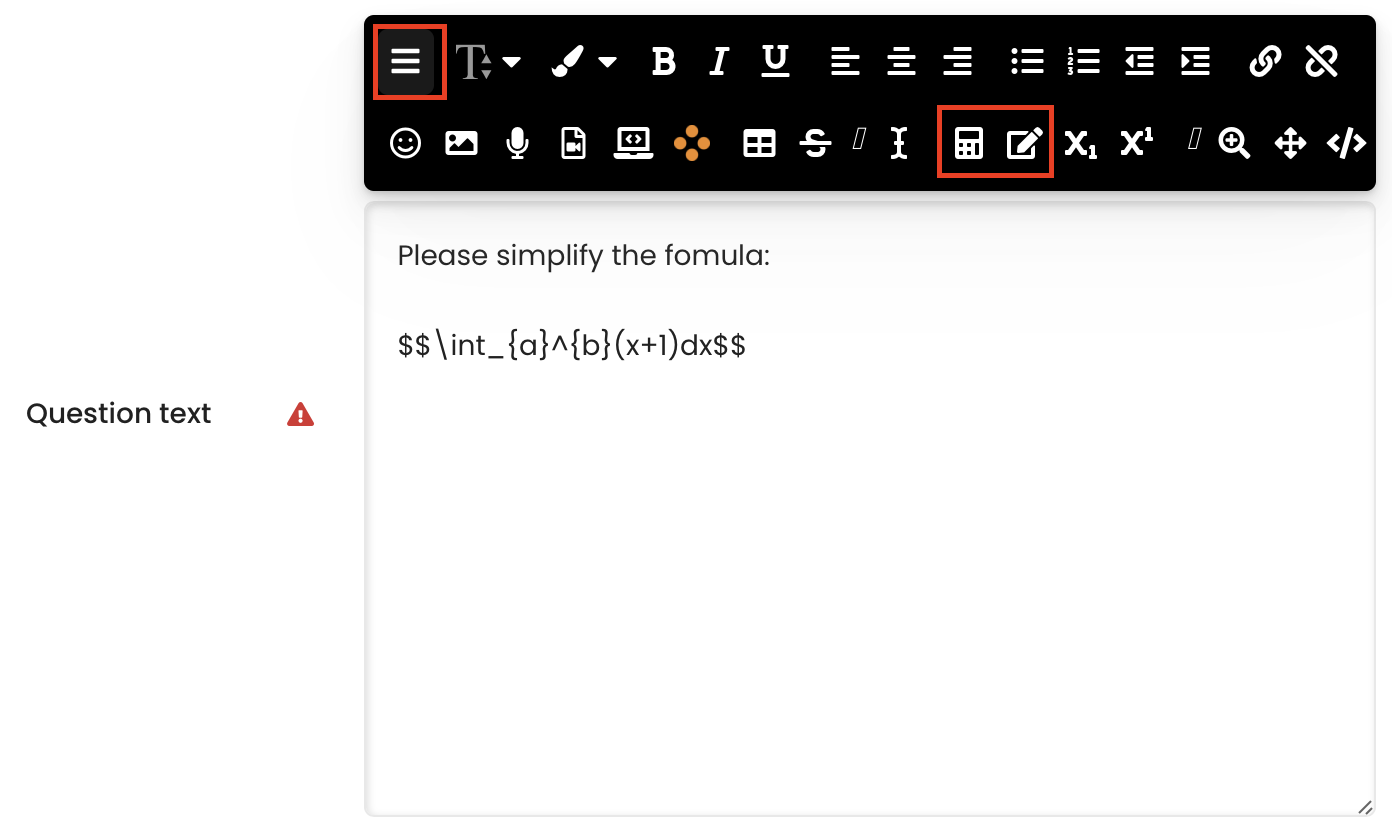
Type in the question in the 'Question text' box, such as the example in the screen shot below.
The special Mathematical formulas and symbols can be written in Latex/Tex. You either edit the formula in Latex editors, or click the icon on the top left of the text box and click the icon highlighted icons in the screen shot to edit Latex formula.
Hint: The random variables, such as variable a and b, need to be covered with '{}', so that the system knows it is a random variable.
Step 7: Set up the full mark and general feedback (optional)
If you do not need to change full mark and give general feedback, you can skip this step.
- Under the 'Default mark', you can change the full mark of this question from 1 mark to other mark.
- Under the 'General feedback', you can add feedback that every student will see.
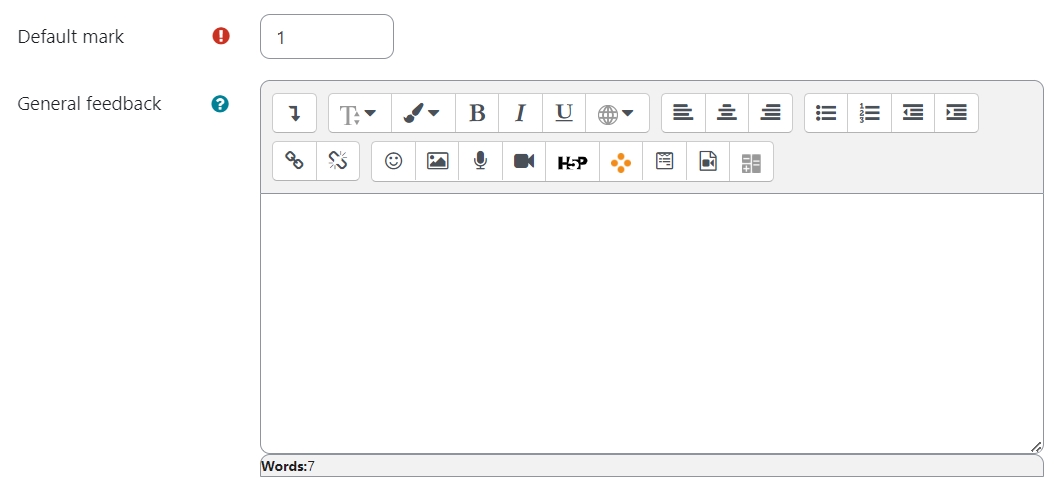
Step 8: Give the correct answer
1. You can type in correct answer in 'Answer' section.
For variables with random values, such as variable ‘a’ and ‘b’ here, it need to be covered within ‘{}’, so that ICE recognises them as variables.
2. Define the grade of this answer. If it is the correct answer, it is 100% in grade.
You also need to add error (so called ‘tolerance’) and a grade to this answer.
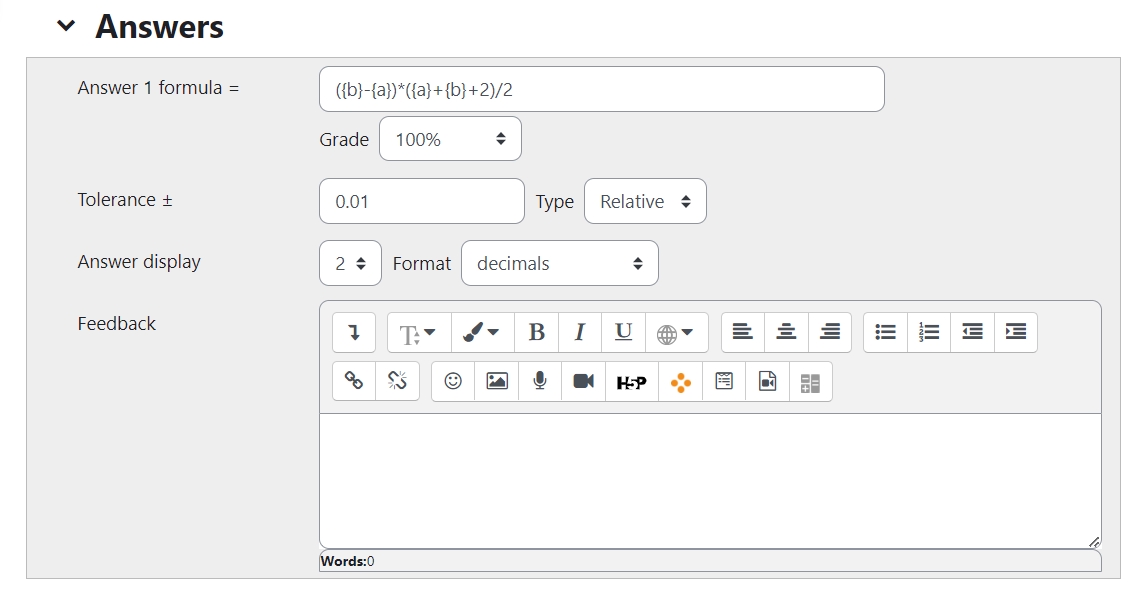
Step 9: Give partially correct answers (optional)
You can also add partially correct answers with the relevant grades and feedback (optional). (If you do not need to it, you can skip this step.)
- Click the 'Blanks for 1 more answers' button
- Add answer, relevant grade, etc. in the same way as above.

Step 10: Enable the use of units (optional)
The 'Unit handling' section controls whether units will be marked, and if yes, how it will be marked.
(If you do not need to mark units, you can skip this step)
- 'Unit handling' setting controls whether units will be marked. By default, units are not marked.
- If choosing the second or third option in 'Unit handling' setting, the following settings will be enabled.
- Unit penalty
- By default, it is 10% penalty.
- By default, it is the penalty depends on the grade that the student get in this question. You can change it to depend on the grade of the full mark of the question.
- Units are input using
- The unit can be input by students, selected in a multiple choice question or a drop-down menu.
- Units go
- the unit goes to the right or left of the answer.
- Unit penalty

Step 11: Define units (optional)
Define the correct units in 'Units' section. (If you do not need to mark units, you can skip this step)
e.g. kW is a correct unit. As it is the unit in the question text, the answer does not need to
However, W is also a correct unit. When using this unit, the answer need to be timed with the multiplier 1000, since 1kW = 1000W.
(If you do not need to add more answers, you can skip this step.)

Step 12: Add random variables
Click the 'Find the wild cards {x} present in the correct answer formulas' button to add random variables.

Step 13: Define random variables
- Click the 'Wild cards parameters used to generate the values' tab.
- In the newly appeared area below the tab, set up the parameters, including the minimum and maximum value and decimal places. If you have more than more random variables, please define them one by one.
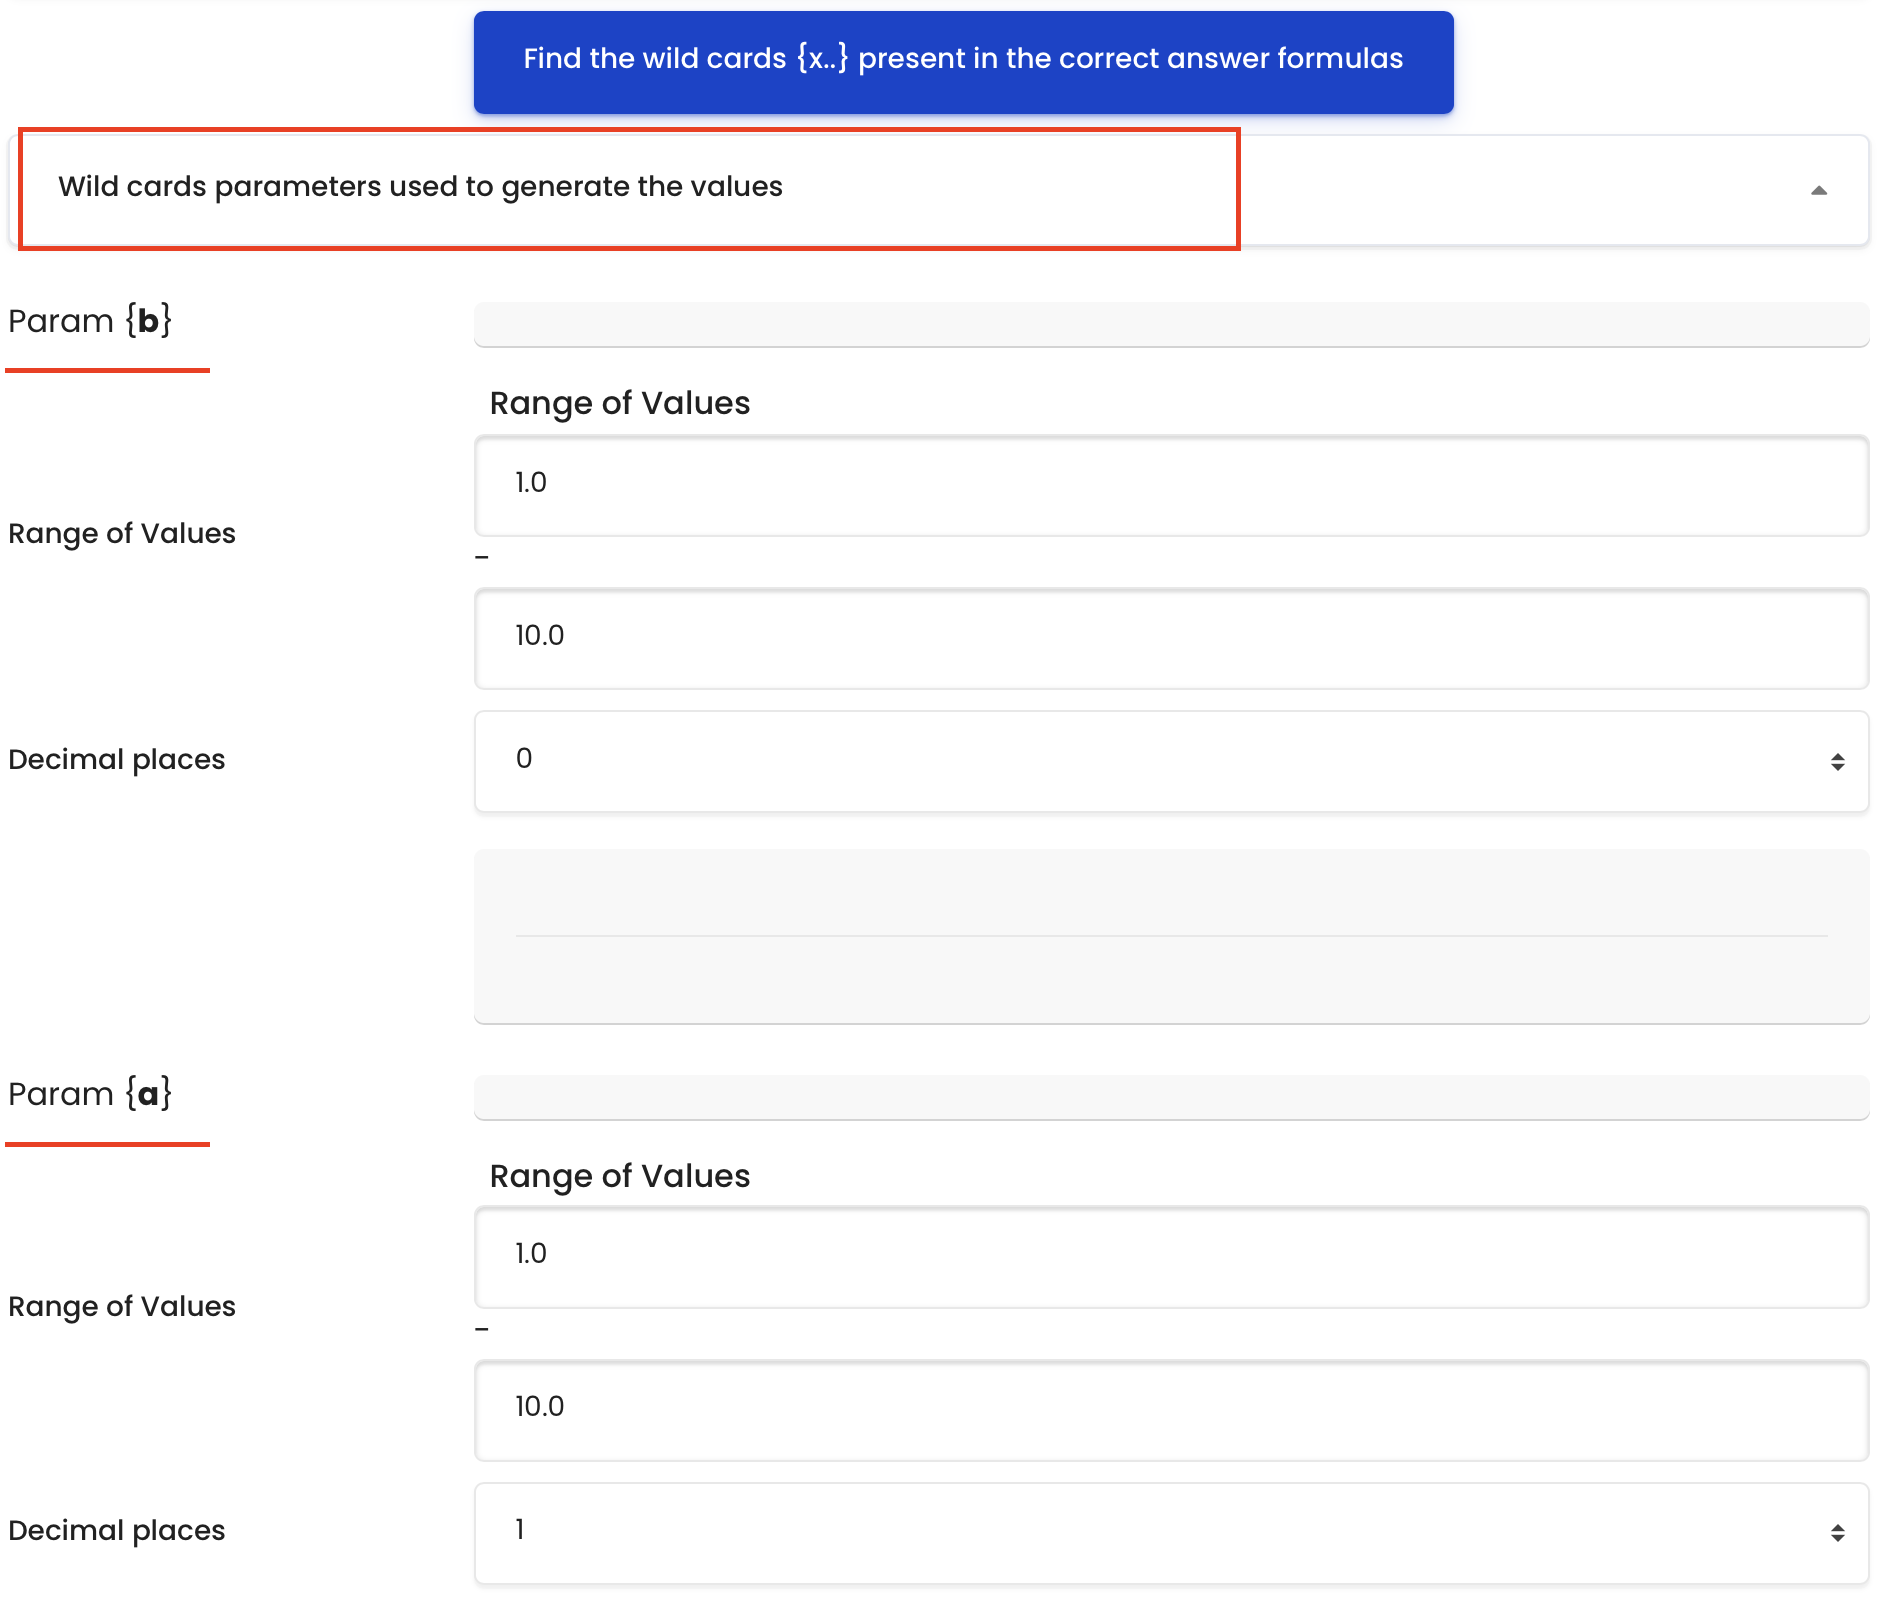
Step 14: Create random variables
- Select a number in 'Generate'+'new set(s) pf wild card(s) values' to create a number of random variables.
- Click the 'Generate' button to create random variables.

Step 15: Display random variables
- Select a number in 'Display'+'new set(s) pf wild card(s) values' to create a number of random variables.
- Click the 'Display' button to create random variables.

Step 16: View random variables
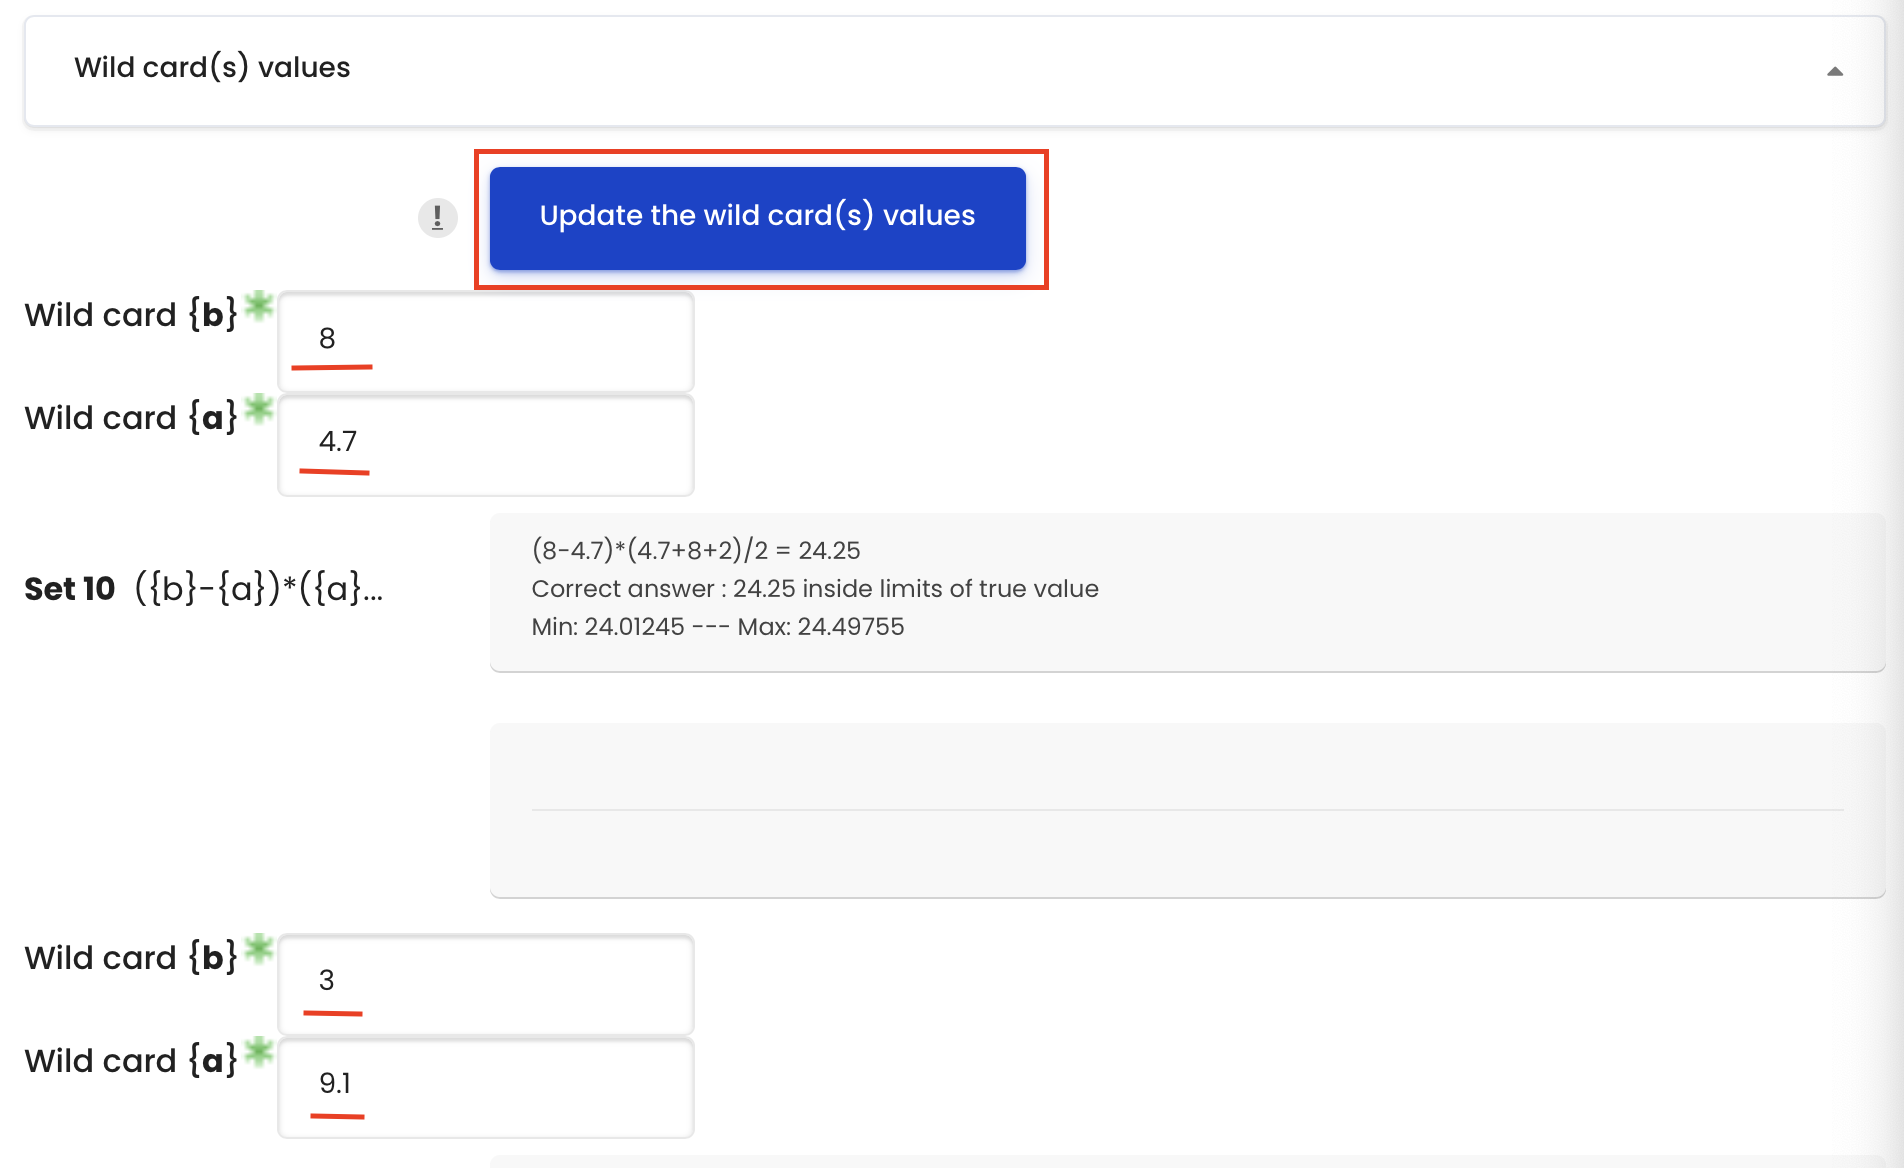
- Click the 'Wild card(s) values' tab to view random variables.
- In the newly appeared area, you can view the value of random variables.
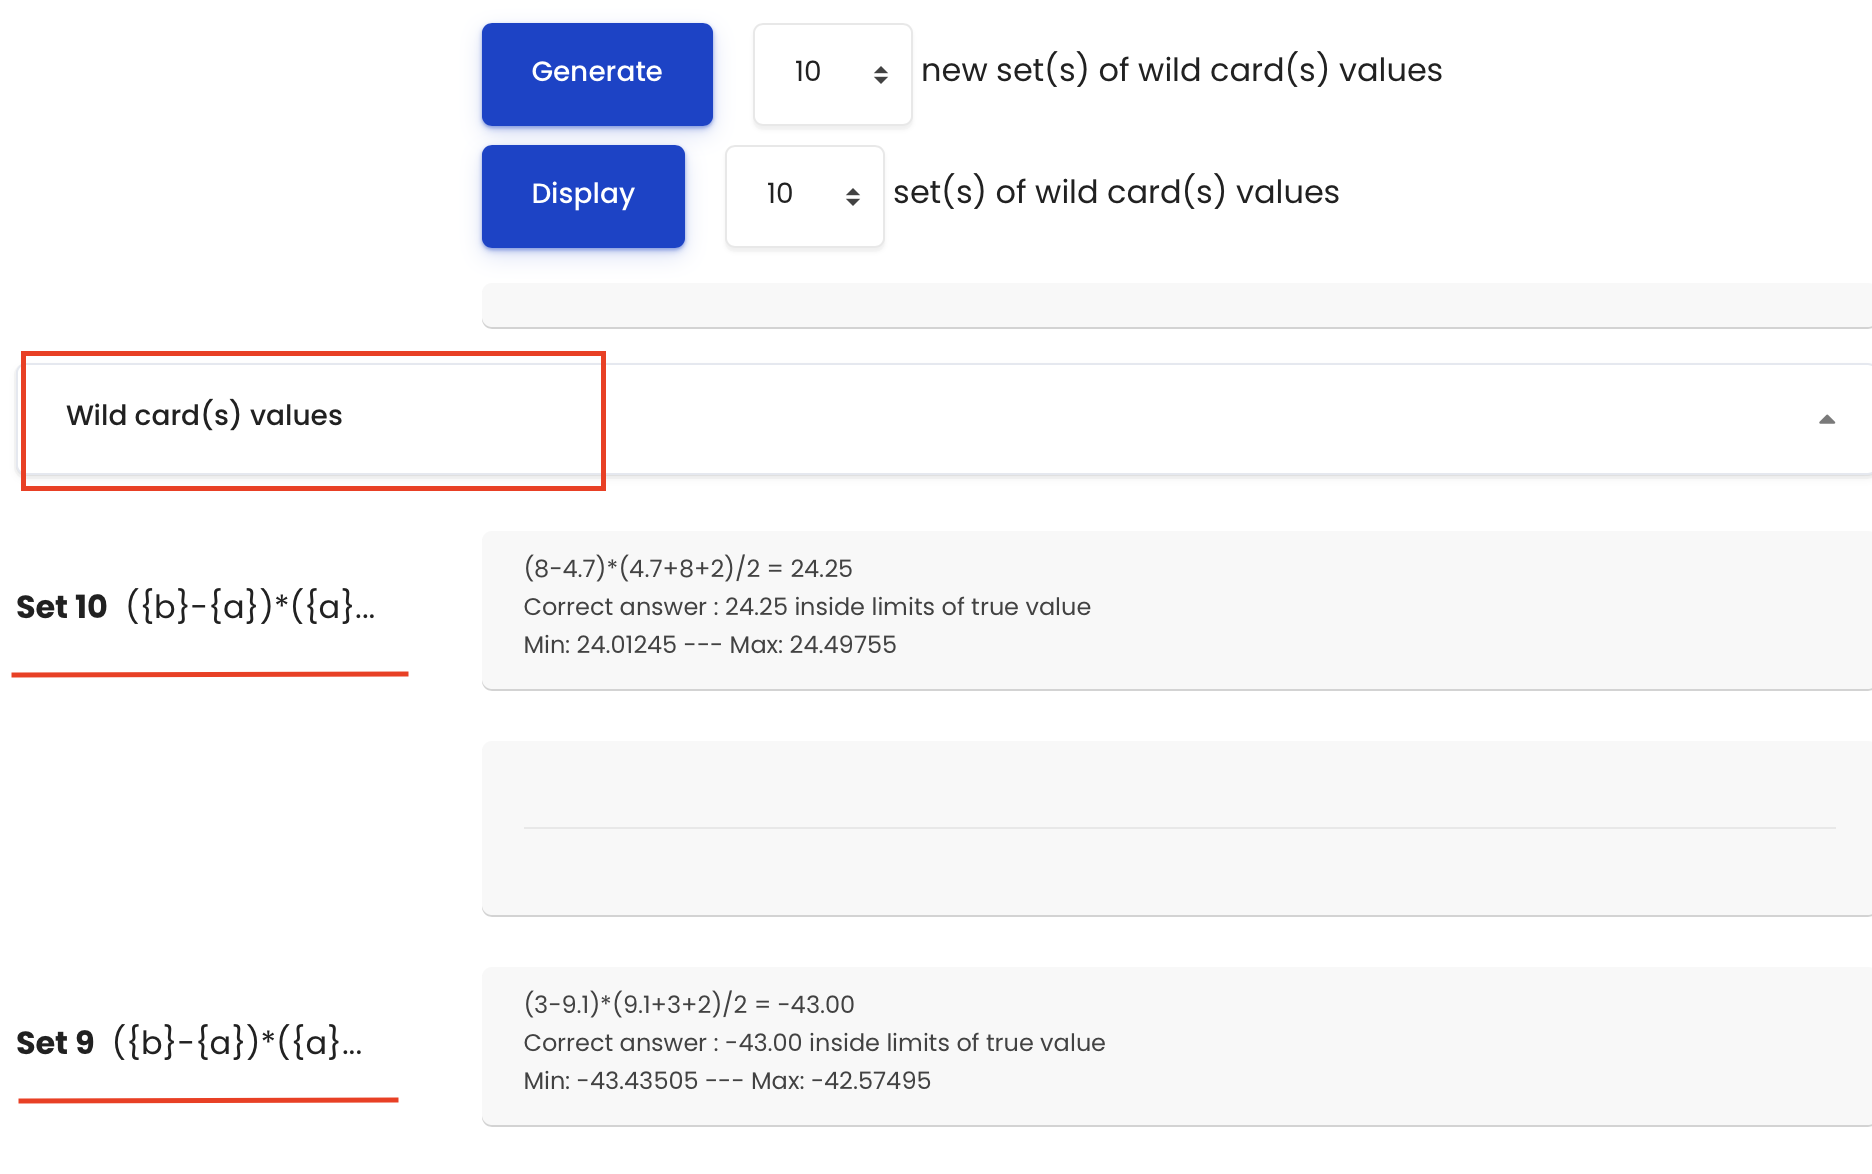
Step 17: View random variables
Click the 'Show more...' button at the end of the displayed random variables.

Step 18: Edit random variables (2)
- You can type in the values of random variables in the place you want.
- Click 'Update the wild card(s) values' button at the top of the displayed random variables to update the value.
Step 19: View the random variables
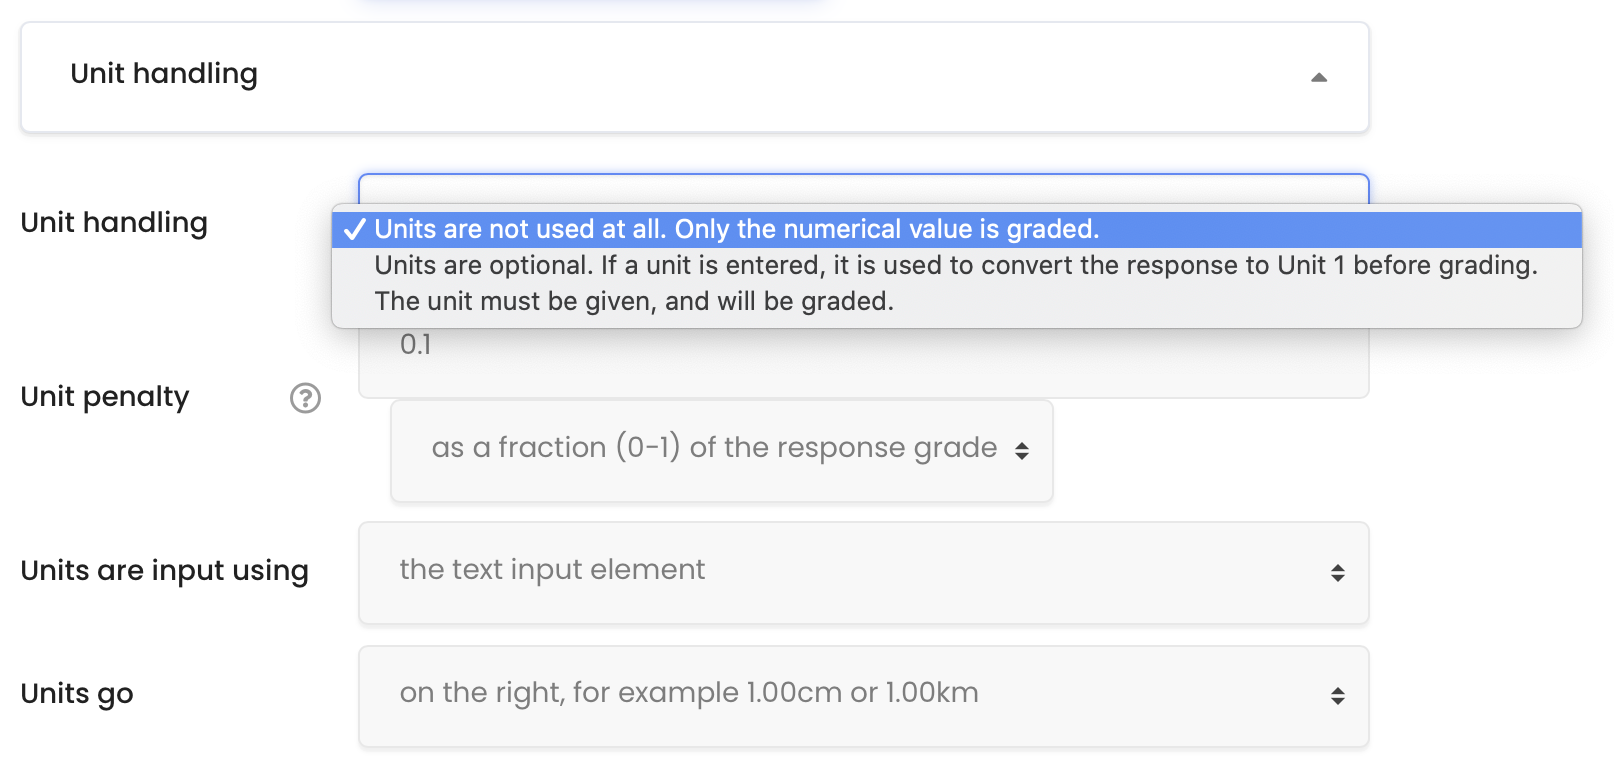
The 'Unit handling' section controls whether units will be marked, and if yes, how it will be marked.
(If you do not need to mark units, you can skip this step)
- 'Unit handling' setting controls whether units will be marked. By default, units are not marked.
- If choosing the second or third option in 'Unit handling' setting, the following settings will be enabled.
- Unit penalty
- By default, it is 10% penalty.
- By default, it is the penalty depends on the grade that the student get in this question. You can change it to depend on the grade of the full mark of the question.
- Units are input using
- The unit can be input by students, selected in a multiple choice question or a drop-down menu.
- Units go
- the unit goes to the right or left of the answer.
- Unit penalty
Step 20: Define units (optional)
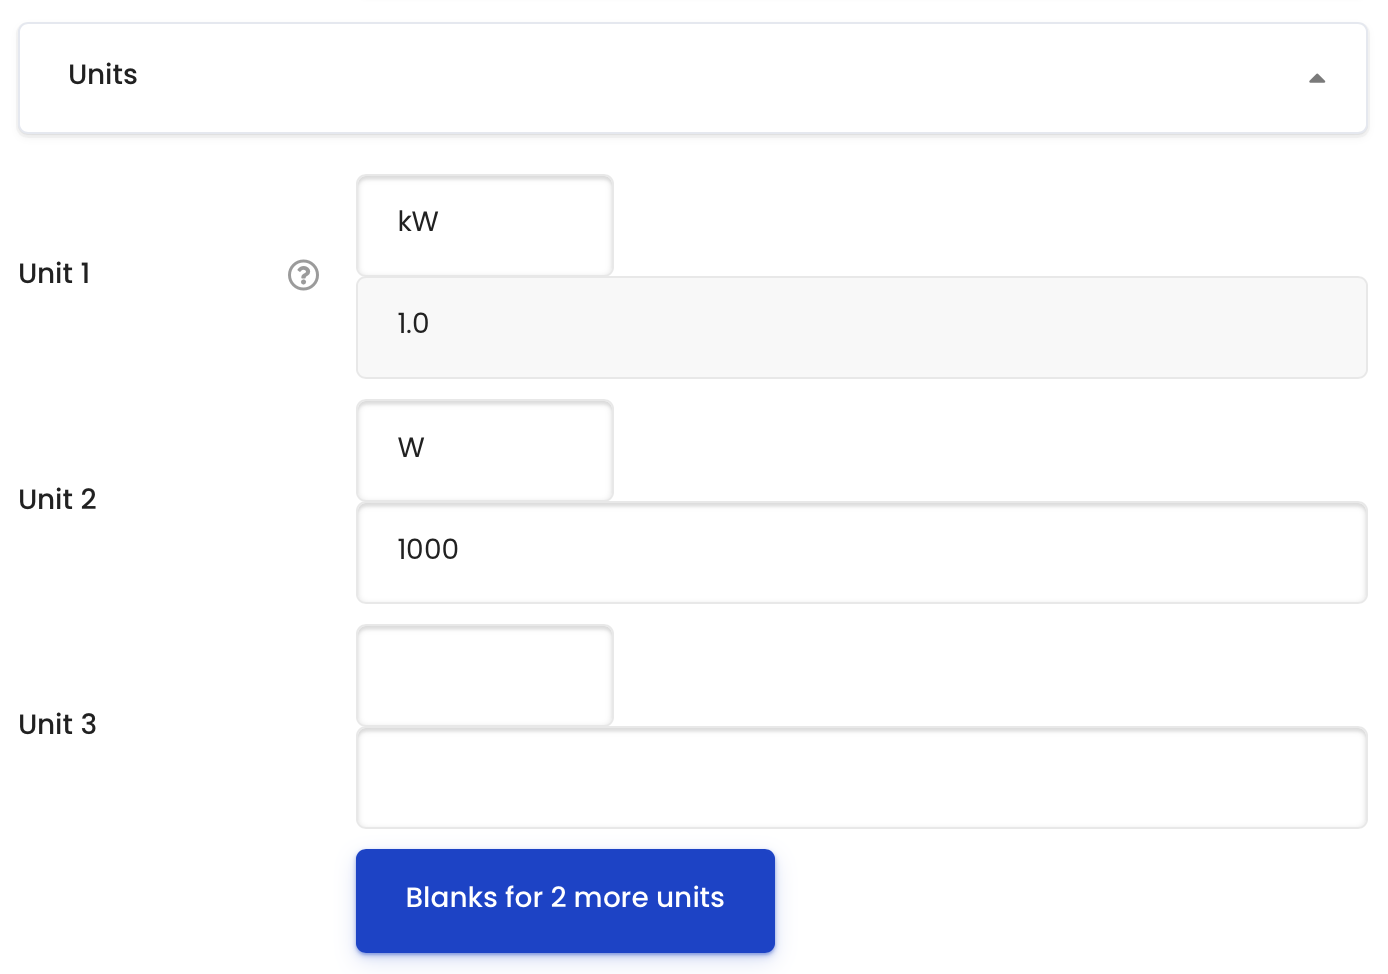
Define the correct units in 'Units' section. (If you do not need to mark units, you can skip this step)
e.g. kW is a correct unit. As it is the unit in the question text, the answer does not need to
However, W is also a correct unit. When using this unit, the answer need to be timed with the multiplier 1000, since 1kW = 1000W.
(If you do not need to add more answers, you can skip this step.)
Step 21: Save the question
Click 'save changes and continue editing' or 'save changes' button to save the question.

Tips:
The random variables, such as variable a and b, need to be covered with '{}', so that the system knows it is a random variable.